
Joshua Feingold
Chief Technology Officer
Perspectives users love the upgraded user experience of the 10.0 release. Especially the new ways they can interact with schema and data. Last month, we explored the way schema design is handled with the new graph model features. Now let's look at the improved graph editing tools and learn how easy it is to modify your data model from within Perspectives.
Data Model Editing: Then and Now
Evaluators frequently ask if Perspectives supports data model editing. The answer is yes!
Users have always had access to our model APIs where they can modify their data and then write the changes back to permanent storage. Then, a few versions ago, we added the capability to define tools in Perspectives Designer without needing code. Now, with the standardization of graph models in Perspectives 10.0, we upgraded the data model editing capabilities significantly. Even if you were familiar with our previous editing features, they’re worth another look.
Step 1: Add a Node
For the sake of example, we'll add a new employee, represented as a node, to a model of a company by using the At Tool. The At Tool creates a new node—you simply click the location in the drawing view where you want the node to appear. To configure the At Tool, you add a Create Vertex Element action to the tool rule. This creates a new Person vertex element. A unique value is automatically assigned to the identifier attribute of each new model element created. Default values are assigned to the other attributes.
From Perspectives Designer, in the Project pane, under the drawing view, expand Behavior and select Tools. Then, in the Tools pane toolbar, click Add At Tool, and define some basic functionality.
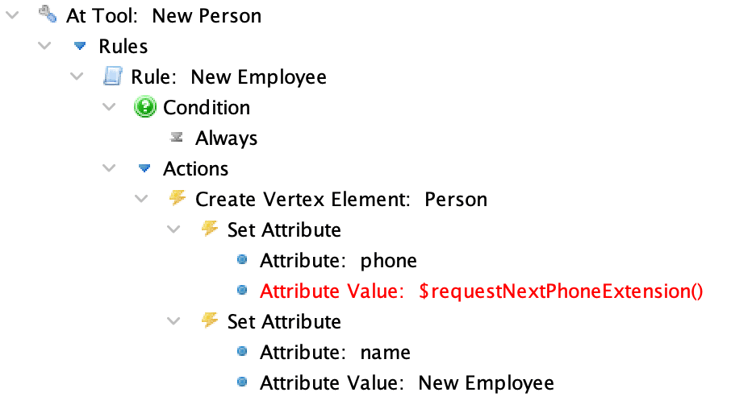
At this point, you can click anywhere in the drawing view to create a new Person model element. Notably, the tool’s primary function is not to create the rendered node but to create the element that tells Perspectives that the node should exist and indicate the node’s initial location. Everything in Perspectives is data first.
The keen-eyed may also notice that $requestNextPhoneExtension() is shown in red. This is because it is a custom expression function and we have not yet told Perspectives how to evaluate it. We'll cover expressions in an upcoming blog post, since they were also improved in Perspectives 10.0. For now, just know that we can use literal values like “New Employee” as well as custom functions like “$requestNextPhoneExtension()” to initialize our elements.
Step 2: Add an Edge
Now we are ready to connect the new employee to the company, also represented by a node, by using the Between Tool. The Between Tool creates a new edge—in the drawing view, click the source element and then drag the mouse to the target element. To configure the Between Tool, add a Has Tags Pair condition and a Create Edge Element action to the tool rule.
In the Tools pane toolbar, click Add Between Tool and define some basic functionality. Next, right-click Rules and add the Has Tags Pair condition. Then right-click Actions and select Create Edge Element.
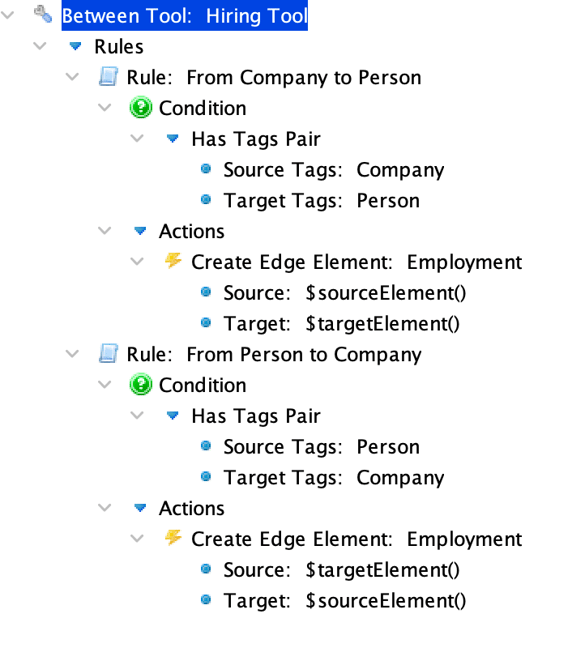
The inherent graph nature of the data model helps us simplify the creation of an edge element. To provide a quick overview of what’s happening here, there are two possible rules that the tool might execute.
- The first rule is executed when dragging the Between Tool from a Company node to a Person node. Because the Employment relationship defined in the schema inherently flows in this direction, we set the Source of the new relationship as the $sourceElement() of the drag and the Target as the $targetElement() of the drag.
- The second rule lets us create the same relationship in mirror image. By dragging from Person to Company, we still understand what should happen, even though the user input was the opposite of the literal direction of the Employment relationship. We just need to map the Source of the Employment to the $targetElement() and vice versa.
This paradigm of checking the source and target types before deciding on the type and direction of elements often means that a single tool can create every possible relationship type, figuring out what to do based solely on what you dragged from and to.
Step 3: Combine the Actions
Given the nature of our example application, we will probably be adding employees far more often than unassociated people. Let’s say that if we add a Person node by clicking on a Company node instead of clicking open space, we shortcut this for our user and create the new employee and employment link at the same time. We can upgrade our At Tool to do exactly this.
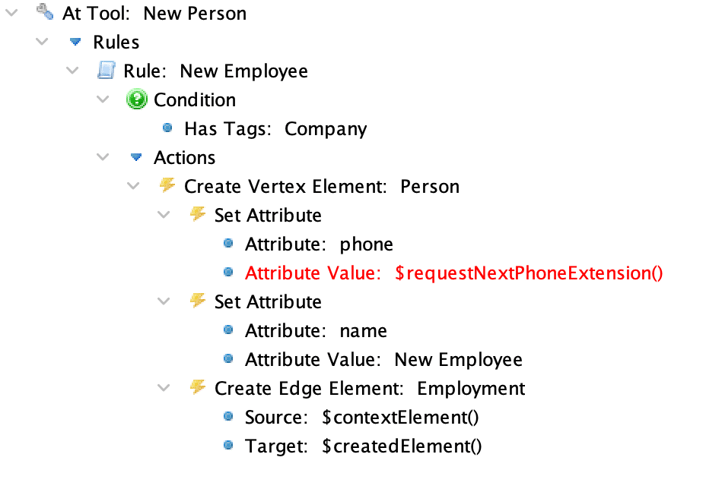
Two changes have been made since we last saw this At Tool configuration.
First, we are checking that we clicked on a Company node with the Has Tags condition. Just as we can with the Between Tool, we use context to figure out what type of element the user wants to create based on where they clicked.
And because the user clicked on a Company node with the At Tool, we can also make our second change: create the Employment relationship as part of this same tool action. Looking at the Create Edge Element: Employment action, we see the same Source and Target fields as when we created a relationship with the Between Tool. However, we are now inside the process of creating a new Person node (the createdElement) by clicking on a Company node (the contextElement.) We can use these as source and target for the new relationship.
Edit Your Data Model in Perspectives 10.0
Building interactive data model editors from within Perspectives has never been easier. Of course, if you want to write your own code or create something really specialized, you still have access to our APIs. But by using the three steps above, you'll be editing your data model in no time. Try Perspectives 10.0 now!
Existing users can simply check their e-mail and use the provided link to access our Download Products page. After signing in, follow the prompts to download the latest version. You can find additional information in the Upgrading section of the documentation.
New users can request a free trial. You’ll receive our software and complete product documentation.
For step-by-step instructions, try the Editing tutorial under Drawing View Behaviors, found in the Tutorials section of our documentation.
About the Author
Joshua Feingold is the Chief Technology Officer at Tom Sawyer Software. He's a Software Architect with experience providing solutions for customers across the spectrum of public and private, large and small, and technical and conceptual. He brings curiosity, an open mind, and a strong background in mathematics, engineering, software, and social and physical sciences to bear on the hardest problems facing modern organizations. He holds a Bachelor of Science in Mechanical Engineering from Caltech.
Submit a Comment